Eyeliner or Eyeshadow first?
- A well-known makeup artist recounts her experience on eyeliner and eyeshadow makeup. Contrary to what you may have heard or read elsewhere, there are no absolute prohibitions or obligations concerning eye make up once you turn the big 40. Make-up is an art that helps everyone to enhance their natural beauty. Therefore, as you begin to embrace your fifties and sixties, just because the glittering eyeshadow or the winged eyeliner you used back in your twenties and thirties does not look quite the same, it does not mean that you have to retire it completely. Only some alterations need to be made in the way eye makeup is done.
- “A great thing to do is sit down with a makeup artist and learn what looks best on yourself,” says MUA Jamie Greenberg. But not everyone needs to do this, especially if they know their face or don’t have access to a makeup artist. If this sounds like you, we tapped Greenberg for her best eye makeup tips for those over 40.
Meet the Expert for best eyeliner
Jamie Greenberg is a celebrity makeup artist and the founder of the Blighlighter. Greenberg’s clients include Rashida Jones and Catherine O’Hara. Keep reading for six of our favorite celeb-inspired looks—along with product picks—ahead.
- Shimmer Eyeshadow
Tips for Using Shimmer Eyeshadow Effectively
When it comes to sparkly eye cosmetics, one can take eyes to another level. Nevertheless, the application of such shine is tricky skin, as any irregularity is emphasized rather than concealed. As celebrity makeup artist Greenberg notes, “One of the biggest mistakes I see is when women tend to blend shimmer eyeshadow too high above their crease.” This is true because such blending often emphasizes unwanted texture on skin which most people do not want to emphasize. Here are some expert tips on how to wear shimmery eyeshadow while maintaining a beautiful and sleek finish:
1. Application Location
The placement of shimmer eyeshadow is key to creating a balanced and flattering effect:
- On the Lid: The most effective application for shimmer is to place it on the eyelids. This enhances the attractiveness of the center of the eyes with minimal distraction and adds a luminous center to the eyes. For a traditional look, place the shimmer on the mobile section of the lid and keep the other sections of the eye bland to keep the juxtaposition.
- As An Accent: Besides being the centerpiece of the eye makeup, shimmer eyeshadow can be used as an accent. Gently apply some shimmer to the inner corners of the eyes to lift them and give the impression of more alert and opened eyes. Similarly, another idea is to place some shimmer on the center of the eyelids over a matte shadow for a dusting effect of highlight.
- As Eyeliner: A novel and exciting means of using shimmer is as a light eyeliner. Take a small angled brush and dip it into the shimmer; your brush should be almost dry and gently outline either your upper or lower lash line to add some sparkle. This method draws attention to the eyes, not the whole look, so it does not incorporate too much glitter.
2. Avoiding Textured Skin
Shimmer eyeshadow can draw attention to fine lines, wrinkles, or uneven skin texture. To achieve a smoother finish, it’s important to focus on applying shimmer to areas of the eye that have minimal texture:
- Avoid the Crease: Blending shimmer too high above the crease is a common mistake. Shimmer in this area can emphasize any texture or creases, making the eye area appear more textured than it is. Instead, keep the shimmer focused on the eyelids and use matte shades for blending into the crease and brow bone.
- Choose Strategic Placement: If you have more textured skin around your eyes, opt to apply shimmer eyeshadow in smaller, concentrated areas like the middle of your eyelid or the inner corners of your eyes. This helps to highlight the eyes without drawing attention to textured skin.
3. Smooth the Base
- Prep the Skin: To achieve a more flawless shimmer application, always prep your eyelids with a smoothing eyeshadow primer. This creates an even base, minimizes creasing, and helps the shimmer adhere better, giving it a smoother, more polished finish.
- Avoid Overpacking: When applying shimmer, avoid using too much product at once. Light layers allow you to build the shimmer gradually without creating a cakey or overly glittery effect that might emphasize skin texture.
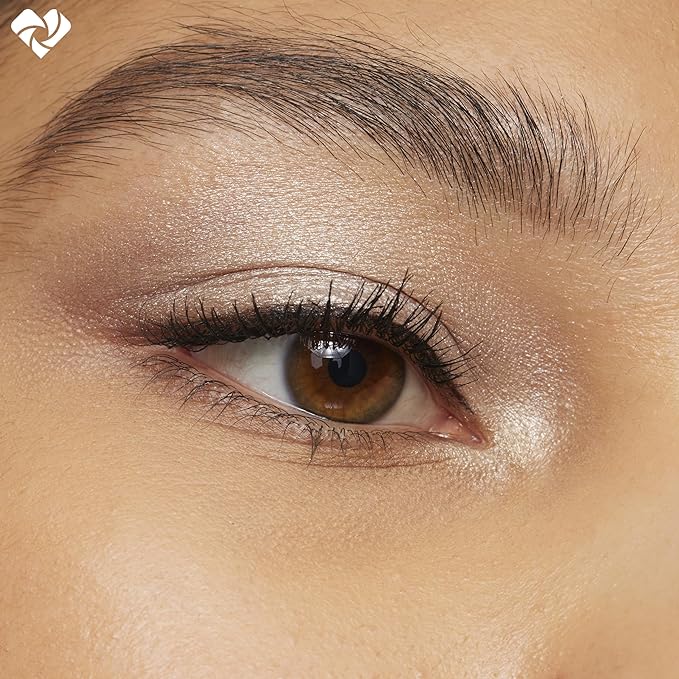
Inner Corner Eyeliner

Highlighting Your Inner Eyes with Shimmer
Just as you apply highlighter on your cheekbones to enhance the light sometimes or to give depth to the face, you can similarly apply it on the inner corners of the eyes to create a fresh and alert look. The famous makeup artist greenberg believes in this principle and explains a simple addition of shimmer can instantly brighten up the eyes. An example in point would be Paltrow who has black eye makeup but still manages to create an impressive look thanks to the subtle champagne shimmer on the inner corners of her eyes. To make those peepers eye catching, here’s the catch:
1. Use a Soft Brush for Precision
It is important to have a steady hand when applying shimmer on the inner corners of the eyes. It is important to enhance the area rather than applying too much product that may cause the eyes to look untidy and overly harsh. Here’s the proper way to do it:
- Brush Selection: When working on this tricky aspect, a small soft brush may be helpful. Pencil brushes or flat shade brushes with soft bristles will work best as they help in shimmer application without mess. That way everyone knows where the shimmer should go without it diffusing out of control into places that are not supposed to be touched.
- The Joint Motion Of Light Taps: Instead, carefully touch the brush on the inside corner of the eyes, inner rim to from fatigue. Once again this can be built up and more added as required. A light hand will be crucial here, more so because the eye is only to be accentuated without distraction and perhaps without additional eye makeup enhancers.
2. Choose the Right Shade of Shimmer
The key to achieving a harmonious, cohesive makeup look lies in selecting a shade of shimmer that complements your overall color scheme:
- Neutral Tones for Versatility: Shimmer shades like champagne, soft gold, or pearlescent ivory work well with most makeup looks and skin tones. These neutral tones provide just the right amount of highlight without clashing with the rest of your makeup. For instance, the champagne shimmer Gwyneth Paltrow used is an elegant choice that adds a subtle pop while keeping the look refined.
- Match the Mood of Your Makeup: If your makeup leans toward warmer tones, consider using a golden or peachy shimmer for a seamless transition. For cooler tones, a silver or soft pink shimmer can beautifully complement your look. Matching the shimmer to the tones of your eyeshadow or overall makeup ensures that the inner corner highlight feels integrated and polished, rather than disjointed.
3. Brighten and Open the Eyes
Placing shimmer in the inner corners of the eyes is a fool-proof and quick way to achieve a brightening effect. Such small enhancements can lead to a big difference, especially in making one appear as if they have bigger and more alert eyes. Be it a natural everyday mouth or an extravagant evening one, this trick helps in providing some form of elegance and class.
Final Tip: Blend with Care
To ensure a seamless transition, blend the shimmer softly into the surrounding eyeshadow. This avoids any harsh lines and helps the shimmer integrate smoothly with the rest of your makeup. If needed, use a clean blending brush to gently soften the edges.
The Colorful Smokey Eyeliner
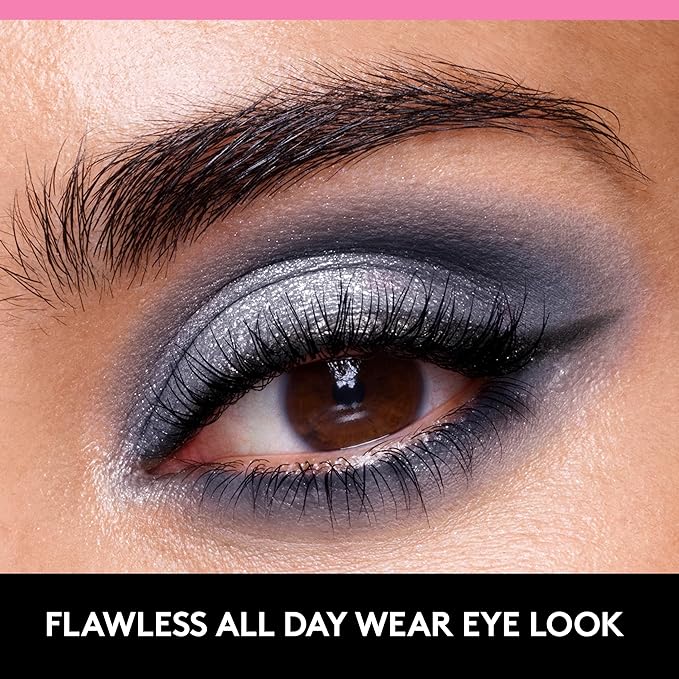
Experimenting with Color in Smokey Eye Looks
When we converse about the traditional smokey eye makeup, most of the people will picture a very intense and dark make-up done with black, charcoal or pewter color. However, natural smokey eye makeup does not always have to be black or something deep. As celebrity make-up artist Greenberg puts it, ‘think outside the box: it is a ‘smokey’ eye which does not have to be super black or super dark.’ With the help of bright shades and modern techniques, this simple look can be lifted into a more exciting contemporary perspective. Here’s a guide on how to add colors into your smokey eye makeup w:
1. Choose Vibrant Colors
The colorful smokey eye certainly gives the same seductive effect as the traditional version however it is more fun and creative. Here are some suggestions on how to experiment with colors:
- Navy Blue: Instead of using black or gray shades, navy is a great replacement. This rich blue hue enhances the overall picture, but is a little subtler and different from jet black. This dark shade of blue looks nice when used with lighter blue colors or even silver for a more exaggerated smokey eye.
- Plum and Burgundy: Somber colors like plum and deep burgundy are perfect when you want to add some warmth to your smokey eye and yet remain sophisticated. These colors are striking and dramatic than the usual dull dark shades but without being too bright. Also, Plum is suitable for various skin types as well as eye colors which makes it the best option.
- Pastel Shades: For a fun element, ditch the classic smokey eye and decide to wear a pastel one. Soft pinks, lavenders or mint green look whimsical, yet feminine and complement the trademark gradient and blending of the smokey eye perfectly. And along with light colors at the center of the look, dark colors at the inner and outer corners enhance the look, yet the depth is still present.
- Bronze and Gold: Should you wish to remain in the warmer side regarding the tones of your smokey eye, then natural colors like bronze or copper will have that rich glowy look. These colors are great to use for a more ‘daily appropriate’ smokey eye but without loss of its drama and richness.
2. Liner for Depth
No matter what color palette you choose, adding depth and definition is essential to a successful smokey eye. To keep the look cohesive and enhance the sultry effect, use black or dark brown eyeliner as a base for depth and contrast:
- Fill in the Lash Line: Line your upper and lower lash lines with a black or dark brown eyeliner. This step ensures that your lashes are well-defined and creates a subtle contrast against the more colorful eyeshadow. Smudge the liner gently for a softer effect that blends seamlessly with your shadows.
- Shadow for Extra Dimension: If you prefer a softer approach to eyeliner, you can use a dark eyeshadow along the lash line instead of a pencil. Apply it with a small angled brush, blending it into the lash line to create a smokey, diffused effect. This adds dimension without the harshness of a traditional eye pencil.
3. Gradual Build-Up for Smokey Intensity
Irrespective of the color palette that one chooses, the main factor of any smokey eye is the blending. Start with a lighter tone as the base color and gradually increase the intensity by adding darker tones on the outer corners and crease of the eye. This layering technique aids in achieving the desired smokey effect without going overboard with color usage.
Final Tip: Experiment with Color Gradients
One way to add complexity to your colorful smokey eye is by creating a gradient effect. For example, you can start with a light pastel shade on the inner corners, transition to a mid-tone shade in the center, and finish with a deeper, bolder color in the outer corners. This adds dimension and keeps the look visually interesting.
Below the Crease
Greenberg recommends keeping dark colors below the crease when you’re creating a smokey eye, as seen on Victoria Beckham. “Don’t bring the darker colors above the crease unless you have untextured dry skin. That will also draw attention to textured skin,” she says. To master this technique:
- Stick to Darker Shades: Use rich colors exclusively below the crease to create depth without overwhelming your look.
- Blend Carefully: Ensure that the colors blend seamlessly for a professional finish.
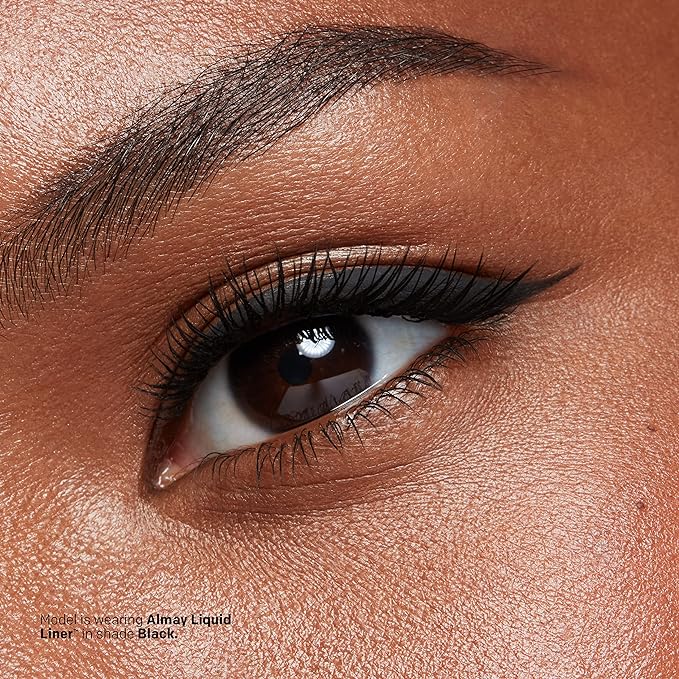
Cat Eye Eyeliner
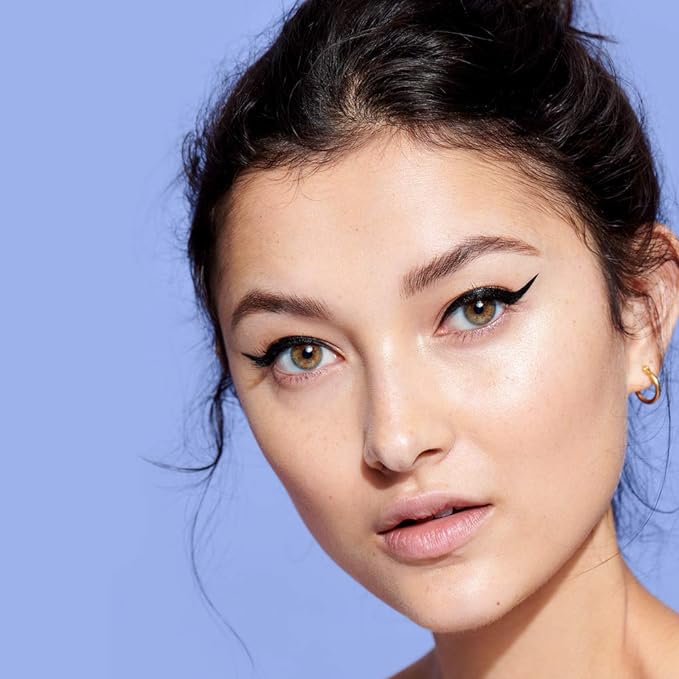
As skin changes with age, certain modifications to the classic cat eye look can lessen its flattering effect for women each in their 40s and upwards. This is a thought shared by celebrity makeup artist Greenberg who provides guiding procedures on how to purse the application of such eye liner with age. In early years, the wing is longer and more dramatic, but it is clear that over the years the wing begins to thicken as the texture around the eye does, and she slims the wing yet shortens it and makes small changes to the overall shape.
Here’s a more detailed guide on how to perfect the cat eye as you age:
1. Shorten the Wing
As skin ages and becomes more textured, particularly around the eye area, keeping the wing shorter is a practical adjustment. A shorter wing can still elongate the eyes without emphasizing crow’s feet, sagging skin, or other natural signs of aging.
- Why Shorter Works: Extending the wing too far may inadvertently draw attention to fine lines or wrinkles at the outer corners of the eyes. By keeping the wing compact and subtle, you achieve the desired lift and definition without accentuating areas you might prefer to minimize.
2. Start with Eyeshadow for Precision
One of Greenberg’s favorite tricks for perfecting the cat eye is to start by mapping out the shape with eyeshadow. This technique helps you achieve the ideal wing shape before committing to a liquid liner, which can be more difficult to erase if mistakes are made.
- Use Neutral or Soft Shades: Choose a neutral eyeshadow shade to outline the shape of your wing. Using an angled brush, lightly trace where you want the eyeliner to go. This not only gives you a guide but also helps soften the overall look, making it more forgiving on mature skin. A soft brown or taupe works well for this purpose.
3. Outline Before Liquid Liner
Once you’ve created the desired shape with eyeshadow, the next step is to trace over it with liquid eyeliner. This two-step process makes it easier to avoid mistakes and ensures the wing is symmetrical on both eyes.
- How to Outline: Start at the outer corner of the eye, drawing a small flick that extends upwards towards the tail of your eyebrow. Then, trace the line along your upper lash line, keeping it as close to the lashes as possible. By following the shadow guide, you can perfect the shape before adding a more defined line with liquid liner.
- Liquid Liner for a Crisp Finish: Once the outline is in place, carefully go over the shape with a liquid liner. Liquid formulas create a sharp, crisp finish, giving you that signature cat eye precision. Opt for a smudge-proof formula to ensure the line stays in place throughout the day.
4. Lift the Wing for a Youthful Appearance
One of the most effective ways to keep your cat eye looking youthful is to ensure the wing is slightly lifted. This subtle upwards flick gives the illusion of lifted eyes, counteracting any natural drooping that may occur with age.
- Angle the Wing: To find the right angle, imagine a line that extends from the outer corner of your lower lash line toward the tail of your eyebrow. This is the natural lift you want to follow. Avoid wings that go straight outwards, as these can drag the eyes down, making them appear smaller or tired.
5. Keep the Rest of Your Eye Makeup Subtle
For those in their 40s and beyond, it’s essential to balance the boldness of the cat eye with the rest of your makeup. Keeping the eyeshadow light and neutral allows the eyeliner to stand out without overwhelming the eyes or making them appear heavy.
- Neutral Eyeshadows: Stick to matte or satin-finish eyeshadows in neutral tones. Shimmery or glittery shades can settle into fine lines and may draw attention to textured skin. Instead, opt for soft browns, creams, or taupes to create a smooth base that complements the cat eye without competing with it.
- Mascara for Lift: A few coats of lengthening mascara will further enhance the cat eye by lifting the lashes and adding definition to the upper lash line. Focus the mascara on the outer lashes for an even more pronounced cat eye effect.
6. Keep It Balanced
“Less can be more on the eyes, and the key is to balance the eye look with the rest of the face,” says Greenberg, especially if you have fair skin and blue eyes. Here’s how to achieve balance:
- Accent Cheeks and Lips: In addition to adding a few individual lashes, she recommends accentuating the cheeks with a creamy, blendable blush like her Blighlighter.
- Bold Lip Options: Greenberg is also a fan of a bold lip—in any shade. Just look to Cameron Diaz’s slightly copper shimmery eyes, rosy cheeks, and matching lip for inspiration.
Our Favorite Products
- Beautycounter Lid Glow Cream Shadow: The creamy texture of this product helps prevent it from clumping in areas that are less spry than they used to be. You can use it as a regular eyeshadow all over your lid or you can take a little to the inner corner of your eye to highlight it.
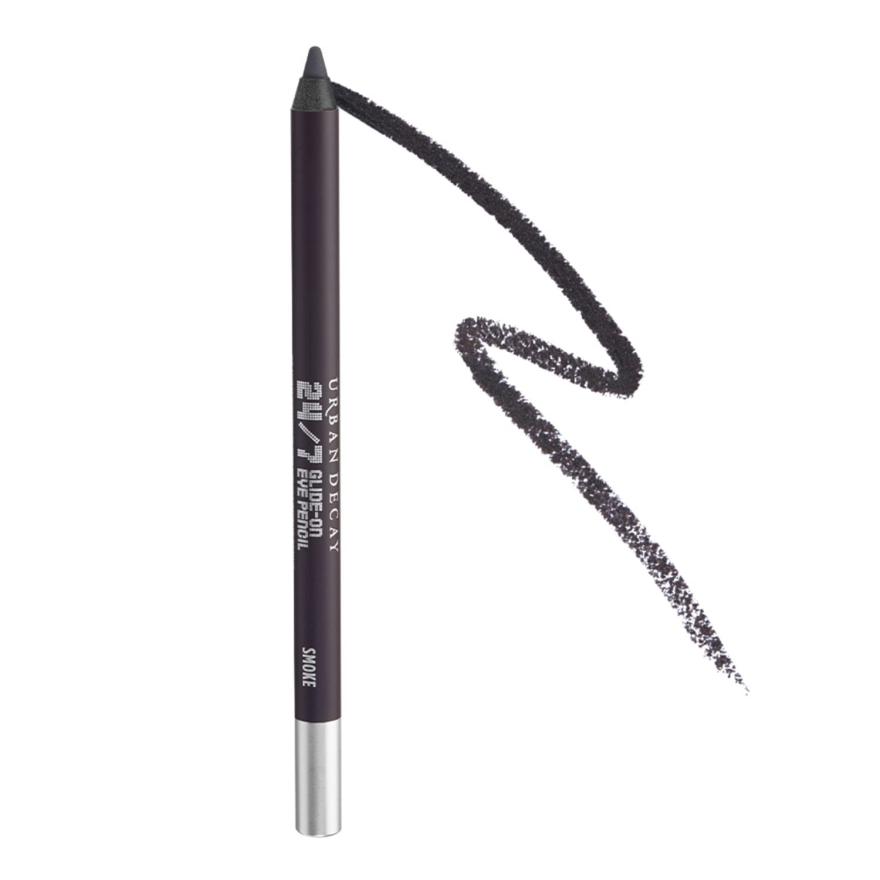
- Urban Decay 24/7 Glide-On Eye Pencil: In our search for the best eyeliners for women over 40, the Urban Decay 24/7 Glide-On Eye Pencil reigned supreme. We love that there are more than three dozen shades available. It’s also a huge pro that this product is cruelty-free and that the pigmentation really complements mature eyes.
- Thrive Causemetics Liquid Lash Extensions Mascara: When it comes to lashes for people over 40, lengthening is key. Thrive Causemetics’ Liquid Lash Extensions Mascara does the trick. It comes in brown and black and adds a lot of length and volume to your lashes.
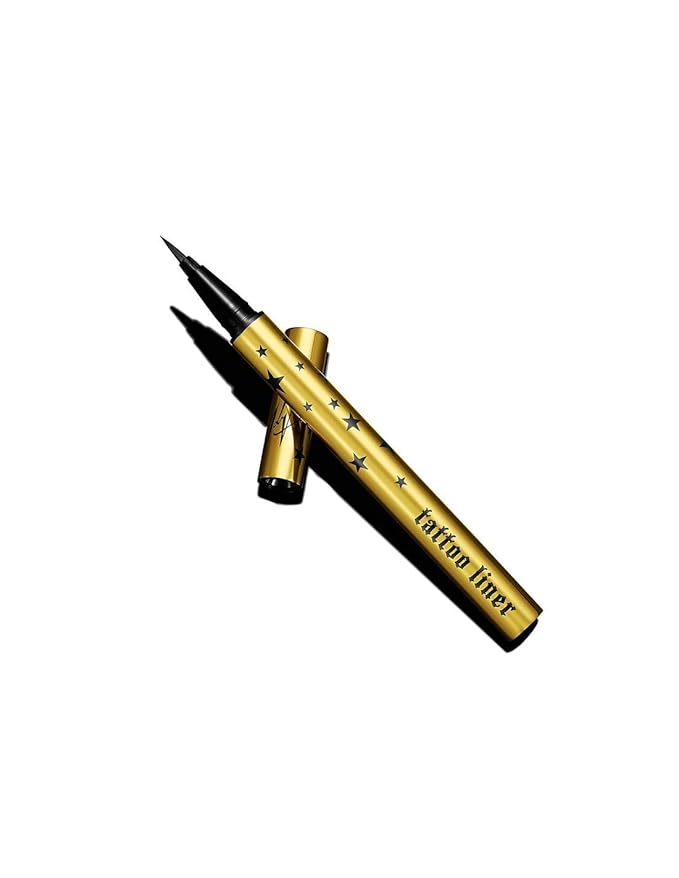
- KVD Beauty Tattoo Liner: If you prefer a liquid eyeliner to a pencil, we’d suggest the KVD Beauty Tattoo Liner. Like the Thrive mascara, this liquid eyeliner is available in brown and black. The standout quality is how pigmented this product is.
To sum up, the issue of whether to apply eyeliner or eyeshadow first presents a myriad of ways to improve your make-up skills, particularly for women aged 40 and above. All methods have their benefits and knowing how to implement them will help you remain happy and pretty as you explore on the where and when of makeup application. Do not be afraid to play with different products and techniques in search of your perfect style. It is shaping of your physical appearance to enable you portray who you are deep down. But in general eyeliner is always applied first before eyeshadow.